The building blocks of learning


toddler toysOften parents ask us how to encourage learning in their toddlers. Everyday experiences with parents and toys are more valuable than flashcards or television. To help understand how simple toys enrich toddler development, we bring you an excerpt from occupational therapist Barbara A. Smith’s award winning  book From Rattles to Writing, A parent’s guide to Hand skills. We appreciated how the book gives tips on making your own toys, and lists very specific “to dos” to encourage not only fine motor development, but visual motor and sensory processing skills at different ages.


Drs. Lai and Kardos


Why are building blocks one of the most universal and time-honored occupations of young children? For one thing, blocks or other objects that stack (i.e., juice packs, scraps of wood, or rocks) are readily available all over the world. Blocks stack easily because they are flat, and the symmetrical cube shape enables children to align them vertically or horizontally.


Stacking helps to develop the perceptual skills and depth perception required to place one block on top of another and the coordination to release the block at the correct time. Children typically learn to stack two and then three common one-inch blocks between the ages of twelve and eighteen months. These blocks are large enough to be easily grasped yet small enough to be stacked using one hand.


Your child’s arms will grow strong as he steadies his shoulders to place the block in just the right position for stacking. After the blocks fall over, he will learn that mistakes are okay, and it is easy to build another tower, and another, and another. Blocks are basic important learning tools to teach concepts, such as tall and short, counting, and color identification. In fact, they are the “building blocks” that will help your child learn to read and write eventually.


The toy industry has capitalized on our love of blocks and has created magnetic blocks, snap-together blocks, blocks that open up to hold a toy, and blocks with sound effects. However, simple, basic blocks are great. They allow for imagination and creativity in a world where many toys are overly complex and require batteries. Whether homemade or purchased, plastic or wooden, soft or hard, titanium or cloth, your child will enjoy many hours of learning with blocks. Blocks are a must for all children.


Barbara A. Smith, MS, OTR/L


An occupational therapist for over twenty years, Ms. Smith received her master’s degree from Tufts’ Boston School of Occupational Therapy, and went on to receive certifications in sensory integration and hippotherapy. Her website is www.barbarasmithoccupationaltherapist.com. Her book, quoted above, won  2012 National Parenting Publications Award, and can be purchased on Amazon.com.


©2012 Two Peds in a Pod®

image_pdfimage_print
Share

Breastfeeding: the first two weeks


breastfeeding cartoon

I always tell new moms that if you can breastfeed for two weeks, then you can breastfeed for two years. The point is, while our species has been breastfeeding for millions of years, sometimes it’s not intuitive. Getting to the two week point isn’t always easy, but once you’re there, you’ll be able to continue “forever.”

So, how to get through those first two weeks of breastfeeding?

Practice. Fortunately, your newborn will become hungry for a meal every two hours, on average, giving you many opportunities to practice. For the first few meals, a newborn can feel full after eating only one teaspoon of colostrum (the initial clear milk). The size of a person’s stomach is the size of his fist. For a baby, that’s pretty small. So relax about not making a lot of milk those first few days.

But remember, your baby’s needs will change and she will start to require more milk. A nursing baby tells the mom’s body to produce more milk by stimulating the breast. Nurse more often and production will increase. Traditionally, moms are told to attempt a feeding every 2-3 hours. But babies do not come with timers, and Dr. Lai tells moms the interval of time between feeds is not as important as the number of times the breast is stimulated. Around 8-12 feedings a day is usually enough to get a mom’s milk to “come in.”

How many minutes should your baby breastfeed at each feeding?

Some lactation consultants advocate allowing the baby to feed on one breast as long as she wants before switching sides. I am more of a proponent of efficiency (I had twins, after all). What works well for many of my patients for the first few days is to allow the baby to nurse for 5-8 minutes on one breast, then break suction and put the baby on the other breast for the same amount of time. If your baby still seems hungry, you can always put her back on the first breast for another five minutes, followed by the other breast again for five minutes. Work your way up to 10-15 minutes on each side once your milk is in, which can take up to one week for some women. Nursing the baby until a breast is empty gives the baby the rich hind milk as well as the initial, but less fatty fore milk. Close mom’s kitchen for at least an hour after feedings. Beware of being used as a human pacifier.

Advantages for this feeding practice:

  1. Prevents your newborn from falling asleep before finishing a feeding because of the activity of changing sides
  2. Stimulates both breasts to produce milk at every feeding
  3. Prevents mom from feeling lopsided
  4. Prevents mom from getting too sore
  5. Allows time in between feedings for mom to eat, drink, nap, use the bathroom, shower (remember, these are essentials of life)
  6. Teaches baby to eat in 30 minutes or less.

I have seen improved weight gain in babies whose moms breast feed in this way. However, if your baby gains weight well after feeding from one breast alone each feeding, or if you are not sore or dangerously fatigued from allowing your baby to feed for a longer time, then carry on!

How do you know if your baby is getting enough milk?

While all babies lose weight after birth, babies should not lose more than 10% of their birth weight, and they should regain their birth weight by 2-3 weeks of life. Babies should also pee and poop a lot (some poop after EVERY feeding) which is a reflection of getting enough breast milk. Your child’s doctor should weigh your baby by two weeks of life to make sure he “makes weight.”

Many good sources can show you different suggestions for feeding positions. Experiment to see which is most comfortable for you and your baby. If you notice one spot on a breast is particularly full and tender, position your baby so that his chin points towards that spot. This may make for awkward positions, but in this way, he drains milk more efficiently from the full spot.

When you first get home with your newborn, if the visitors in your house aren’t willing to do your dishes, then kick them out. It’s time to practice feeding.

Stay tuned for our next post where we address breastfeeding beyond two weeks.


Helpful websites:

To find a  lactation consultant near you see the International Lactation Consultant Association

For our moms across the world and the States- La Leche League International and The Children’s Hospital of Philadelphia- breastfeeding tips for beginners

For moms in Bucks, Montgomery, and Philadelphia Counties, Pennsylvania- Nursing Mother’s Advisory Council


Julie Kardos, MD and Naline Lai, MD

©2012 Two Peds in a Pod®


image_pdfimage_print
Share

ABC and zzzz’s on Parent Connections Cable TV

CBCaresDo you live in the Central Bucks School District in Pennsylvania? We just got back from filming a segment on sleep and breakfast hints on Parent Connections- running through September.

CBTV community cable
Comcast 28/Verizon 40
7:30 pm on Tuesday, Thursday and Sundays


Julie Kardos, MD and Naline Lai, MD
©2012 Two Peds in a Pod®


image_pdfimage_print
Share

It’s a nailbiter…paronychia infections

finger infection

Ouch! This kid’s index finger has a finger nail infection called a paronychia. Often seen in nail biters and cuticle pickers, this infection occurs in the skin around fingernails. Although most kids are not dexterous enough to bite their toenails, infection can also occur in toes. Bacteria which normally live on skin (Staphylococcus or Streptococcus) find an opportunity to enter the body through openings in broken skin.

The area at the periphery of the nail bed is red, swollen, and painful. At times pus drains from under the nail bed.

Caught early, warm, soapy soaks several times a day may be enough to soften the tense skin and encourage germ-fighting cells to migrate to the infection. After soaking, apply topical antibiotic, such as Bacitracin, to the area.  Often the infection improves after 2-3 days of diligent soaking.

Sometimes the infection persists and oral antibiotics are needed to treat the bacteria. In this photo, the redness of the child’s paronychia is spreading beyond the area immediately next to her nail. Besides increased redness, other worrisome signs of worsening infection include red streaks up the affected digit (a sign that the germs are trying to make it up to the heart),  increasing pain, or fever. Your child’s pediatrician will make the call after examining your child.

Although I do not keep formal track, I do seem to see more of these infections at the start of the school year when kids at their desks begin to bite or pick their nails and cuticles. To prevent infection, remind your kids to wash their hands. If you have a biter/picker, have her substitute a different habit such as picking at a hair scrunchie or Silly Bandz. A more expensive and time consuming option, which Dr. Lai has seen work—offer a fancy manicure.  Kids rarely want to ruin beautifully painted nails by chewing on them.


Julie Kardos, MD and Naline Lai, MD
©2012 Two Peds in a Pod®


image_pdfimage_print
Share

Hellos and good-byes: school 2012


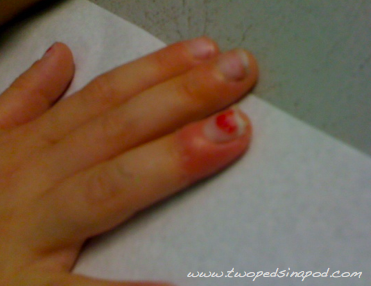
In the office it’s raining school forms. At this time of year, I see many of my patients embarking on their next stage of schooling. Kids I remember starting kindergarten are off to high school. Babies are starting daycare and  teens are starting college. For all the parents who have a child entering a new school, whether it’s preschool or college, this letter is for you:


My Child,


As we sit, the night before kindergarten, your toes peeking out from under the comforter, I notice that your toes are not so little anymore.


Tomorrow those toes will step up onto to the bus and carry you away from me. Another step towards independence. Another step to a place where I can protect you less. But I do notice that those toes have feet and legs which are getting stronger. You’re not as wobbly as you used to be. Each time you take a step you seem to go farther and farther.


I trust that you will remember what I’ve taught you. Look both ways before you cross the street, chose friends who are nice to you, and whatever happens don’t eat yellow snow. I also trust that there are other eyes and hearts who will watch and guide you.


But that won’t stop me from worrying about each step you take.


Won’t stop me from holding my breath­.


Just like when you first started to walk, I’ll always worry when you falter.


I smile because I know you’ll hop up onto the bus tomorrow, proud as punch, laughing and disappearing in a sea of waving hands. I just hope that at some point, those independent feet will proudly walk back and stand beside me.


Maybe it will be when you first gaze into your newborn’s eyes, or maybe it will be when your child climbs onto the bus.


Until then,


I hold my breath each time you take a step.


Love,
Mommy


No matter the stage, to smooth your child’s (and your) transition, remember the basic rules of daycare drop-off:


  • Always convey to your child that the transition is a positive experience. You give your child cues on how to act in any situation. Better to convey optimism than anxiety.
  • Take your child and place her into the arms of a loving adult- do not leave her alone in the middle of a room.
  • Do not linger. Prolonging any tears, only prolongs tears. The faster you leave, the faster happiness will start.
  • It’s ok to go back and spy on them to reassure yourself that they have stopped crying- just don’t let them see you.
For more back-to-school related posts, please be sure to read
How can I motivate my child in school- creating the resilient learner
When children should stay home from school for medical reasons (or listen to our podcast on this subject)
Packing your child’s school lunch: beware of junk food disguised as healthy food
Avoid back strain: what to look for in a school backpack
Wake up, sleepyhead, it’s time for school – how to shift your child’s sleep into a pattern more compatible with school hours

Naline Lai, MD and Julie Kardos, MD

reformatted from original 8/17/09 post
©2012 Two Peds in a Pod®

image_pdfimage_print
Share

Sporting a good attitude- an olympian effort

My kids and I cheered as we watched the Olympic swim races together on TV. Having just finished their first summer swim team season, they were especially interested in these events. While we joked about how much faster Olympian swim times were than their own, we also noted that “just like on swim team” at the end of the races, the Olympians shook hands with the swimmers in the adjacent lanes. It got me thinking about sportsmanship.

The adage says, “It’s not whether you win or lose, it’s how you play the game.” But our society puts such heavy emphasis on winning, coming in first, being the best (and thus beating out others) that kids can feel extreme pressure to win. Parents should resist adding to that pressure.

We, as parents, have to accept that our kids can’t always come in first, get the perfect score, or win everything they do. From an early stage, we need to praise our children’s effort, and also teach them to appreciate other kids’ efforts, skills, and accomplishments. We can say to our kids, “Wow, Bobby sure is a fast runner. I bet if you practiced running (or hitting, or catching, or kicking) you could get better too. I’ll help you if you want.” Teach your child that if she wants to improve a skill or test grade, she will have to work at it. Friendly competition that inspires us is a good thing. Kids cheat when they feel too much pressure to win, and fail to understand that there are no “quick fixes.”

When parents (and coaches) fail to model good sportsmanship, kids blame their pitcher when the other team hits, blame their goalie for letting up scores, blame their parents for not buying the most expensive equipment that would have enhanced their performance. At one of my kid’s games, I saw a young athlete punch a child on the winning team during the end-of-game “high five/good game” ritual because he was so angry that his own team lost the game.

Unfortunately, some teen athletes convince themselves that “because everyone does it,” it’s okay to cheat by taking steroids to enhance their performance. Students without a diagnosis of attention deficit hyperactivity disorder cheat by taking their friends’ ADHD medications so they can concentrate longer when studying for exams or completing homework. Even Olympic athletes cheat. Discuss with your children why eight badminton players were disqualified when they attempted to throw their games in order to get a “better” placement in the tournament. Because they cheated, they were given NO place in the tournament.

The 2012 Olympics is a perfect opportunity for parents to point out examples of good sportsmanship to their children. Even the Olympic athletes who cry from disappointment express support for their teammates and gratitude at the opportunity to compete at such a high level. So as we cheer for our own country or for our favorite athletes, let’s also teach our kids to cheer the athletes’ sportsmanship and performance.

Kids should learn to work hard, study hard, do their best all of the time. We hope that as adults they will value themselves and others for having good work ethics and improving their skills. Of course we should teach our kids to “go for the gold.” But we also need to be clear that we still love them even if they never claim a medal.

For tips on fostering sportsmanship in kids, see this post from the  Nemours Children’s Health System.

Julie Kardos, MD and Naline Lai, MD
©2012 Two Peds in a Pod®

image_pdfimage_print
Share

Spotting the rash of ringworm

ringwormAlthough it’s called ringworm, this rash isn’t caused by a worm.  In fact, it barely looks like a worm. Otherwise known as tinea corporis, the patch of ringworm is usually a flesh or light-pink colored, slightly scaly oval with raised, red edges.

Caused by a fungus, sometimes the patch is itchy. The same organism also causes athlete’s foot (tinea pedis), jock itch (tinea cruris)  and scalp infections (tinea capitis).

Ringworm falls into the mostly-harmless-but-annoying category of skin rashes (cover it up and no one will notice). Your child’s doctor will diagnose the rash by examining your child’s skin. To treat the rash, apply antifungal medication until the rash is gone for at least 48 hours (about two to three weeks duration). Clotrimazole (for example, brand name Lotrimin) is over-the-counter and is applied twice daily. You will find it in the anti-athlete’s foot section.

On the scalp, ringworm causes hair loss where the rash occurs.  Treatment is not so straight forward. Ringworm on the scalp requires a prescription oral antifungal medication for several weeks. The fungus on the scalp lives not only on the skin, but also in hair follicles. So, topical antifungals fail to reach the infection.

Ringworm spreads through direct contact. Wrestling teams are often plagued with this infection. Cats may carry ringworm. If your family cat has signs of feline ring worm such as patches of hair loss, take him to the vet for diagnosis.

If your child’s “ringworm” fails to improve after a week of applying antifungal medication, have your child’s doctor examine (or re-examine) the rash. Other diagnoses we keep in mind include eczema and granuloma annulare. If the rash continues to enlarge we consider Lyme disease.

The sooner you start to treat ringworm, the more quickly it resolves. Just remember, “the early bird catches the…” oh never mind.

Naline Lai, MD and Julie Kardos, MD
©2012 Two Peds in a Pod®

image_pdfimage_print
Share

The dirt on tetanus

tetanus

fodder for tetanus…don’t get this stuck under your foot

Look at this rusty old anchor atop an old fort. Rust plus dirt equals a perfect breeding ground for tetanus. As my kids scampered between different anchors last week, I quickly calculated in my mind whether their preventative tetanus shots were up to date.

“Getting the tetanus shot” is part of the American societal childhood rite of passage, but most people don’t know much about why their kids are vaccinated. Everyone knows they want to avoid IT, but what is IT? Because it is somewhat rare in the United States, I still remember asking one dad about his child’s family history. I was startled when he erupted onto peals of laughter after he told me the child’s grandfather had died of tetanus. “Why are you laughing?” I said in disbelief.

“You’re right, it’s not funny… It’s just the look on your face is funny,” he said. “Everyone has the same shocked expression when I tell them that he died from tetanus.”

Also known as Lock Jaw, tetanus is an organism which thrives in places with little oxygen. Thus, it tends to live on rusty nails (and anchors!) and deep in dirt. Tetanus secretes a poison which causes muscles to spasm painfully and severely and also causes seizures. Exposed to tetanus, your jaw muscles clench into a sardonic smile which prevents eating – hence the name Lock Jaw. Eventually, the tetanus poison infiltrates the chest muscles that help you breathe, and if you are like nearly 40 percent of cases, you will stop breathing and eventually die.

We have no antidote for the poison of tetanus- but we do have a preventative immunization which causes our bodies to preemptively prepare antibodies as self-defense. At the time of a high risk injury, if needed, doctors will boost your child’s tetanus immunization. If your child is under- immunized, the doctor will also inject your child with tetanus antibodies (tetanus immunoglobulin) to further ensure that your child will not contract this disease.

Because tetanus thrives away from oxygen, it easily multiples in deep wounds contaminated by the germ. The germ surrounds us in soil and also lives in intestines of humans and animals. Since tetanus lives in dirt, the following are considered “high risk” injuries:

   -Bites from animals which dig and “eat” dirt such as dogs.

    -Deep puncture wounds from dirty, rusty nails.

    -Wounds with embedded rocks and gravel.

Be wary of tetanus in wounds possibly contaminated with stool, dirt ,or saliva. In developing countries, there are continued cases of infantile tetanus because poultices of mud are used to take care of the umbilical cord stump of newborns.

For kids, the recommended ages for tetanus shots are at 2 months old, 4 months old, 6 months old, 15-18 months old, 4-6 years old, 11-12 years old, and then every ten years through adulthood. Note, if a high risk wound is sustained, the last shot should be within five years. Thus, a kid around 9 years old may be up-to-date for shots, but because he received a tetanus vaccine at four-years-old (on time) he will still need an immunization at the time of a risky injury. Watch out also if you have a teen. His pediatrician will immunize him at 11-12 years of age, but after 16-17 years old he will need a booster if he sustains a dirty wound.

Nowadays, the tetanus immunization is in the same solution as an immunization against diptheria (a disease that causes a choking-inducing coating at the back of your throat), and usually in the same solution as pertussis (whooping cough). If your doctor gave your child an immunization recently against pertussis, she also received a tetanus immunization.

Kids are expected to get dirty. Enjoy the dirt—just not the tetanus.


Naline Lai, MD with Julie Kardos, MD
©2012 Two Peds in a Pod®

image_pdfimage_print
Share

From KFIT video star Dr. Pat: Tips to get kids to eat their fruits and vegetables

It’s a heat wave and in extreme temperatures, kids, like adults, find it tough to go outside for physical activity. We find it perfect timing for the release of Dr. Pat Cantrell’s new kid fitness video (demo below). The video, made in conjunction with kids fitness expert Anna Renderer, gives follow-along exercises along with health advice tailored to kids.  We asked Dr. Pat to expand on one piece of advice she gives in the video: eat five servings of fruits and vegetables a day. For many parents, even one serving can be tough to get into a child. Many a parent has asked himself, “Does one bite of zucchini spit back onto the table count as a serving?” If this is you, then you’ll appreciate Dr. Pat Cantrell’s guest blog post.

– Dr. Lai and Dr. Kardos

Not eating enough fruits and vegetables is one of the biggest concerns that parents have regarding their children’s diet.  The US department of agriculture recommends that children get at least five servings of fruits and/or vegetables in their diet every day.  But most kids aren’t getting that amount.  Below are 5 tips that can help children get their 5 a day.

  1.  Cut it!  Kids love when food is cut into pieces that they can pick up.  An apple or orange might sit on the counter in the fruit bowl.  But, cut it up and all of a sudden it is much more appealing.  Even the fast food restaurants have figured this out and instead of just handing a child an apple or orange with their kid’s meal, they get apple or mandarin slices.
  2. Dip it!  Some vegetables can be bitter to a child’s immature taste buds.  Offering a yogurt or ranch dip can add the flavor they like and helps mellow out the taste of the vegetable.  
  3. Hide it! What they don’t know won’t hurt them!  By disguising fruits and vegetables, kids will get the nutrients they need.  Plus, without knowing it, kids will learn to develop the taste for the vegetables or fruits and their taste buds will be more accepting of the fruit or vegetable in the future.  Smoothies are a perfect way to blend in a few servings of fruits and/or vegetables.  You can also puree vegetables like carrots or spinach and add that to a pasta sauce!  For more ideas, check out Jessica Seinfeld’s cookbook “Deceptively Delicious”.
  4. Grow it! Gardens are a great way to get kids to eat more fruits and veggies!  I took my sons (7 and 9) to their grandmother’s house and they ate just-picked sugar snap peas.  I was shocked!  First of all, they tried it without whining and second, they liked it and asked for more!  Since the fruits and vegetables can be picked when they are ripe, they often taste better than the store bought version.   Kids love to see the food grow and helping them be a part of the process encourages healthy eating.
  5. Make it fun!  Put cream cheese on celery and add raisins on top and you have Ants on a Log.  Use cookie cutters to cut watermelon or cucumbers into fun shapes.  The more appealing it looks, the more kids want to try it.  For some fun ideas, check out http://familyfun.go.com/recipes/cooking-with-kids/.

Be creative and persistent and try to offer at least one or two servings of fruits and/or vegetables at each meal.

Pat Cantrell, MD, FAAP

Dr. Pat Cantrell, mother of two young boys (who can be picky eaters at times!), is a board certified pediatrician who has been practicing pediatrics at Southern California Permanente Medical Group for over 14 years. She has a special interest in pediatric obesity and is the President of KFIT Health, LLC (www.kidfitnessandhealth.com) which creates fitness and nutrition DVDs and products for children. A board member of the San Diego Childhood Obesity Initiative, Dr. Cantrell is also the Pediatric Obesity Champion for her medical group. Additionally she serves as Secretary of the San Diego Chapter of the American Academy of Pediatrics.


©2012 Two Peds in a Pod®


image_pdfimage_print
Share